Saturday, June 22, 2019

Analyzing MSFT Financial Data using AlphaVantage and Google Colab

In today's world, it's very easy to analyze data sets online, including financial data. This article shows how to compute standard statistical properties of a financial data set, like linear approximation and standard deviation. The example is using python based jupyter notebook, shared through Google Colab.

Here's a Jupyter Notebook, which can be used for this exercise.

First, we start by creating an API key in AlphaVantage.


Next, we can display a downloaded financial dataset, which corresponds to MSFT historical data.

After this step, we run statistical analysis of dataset using Python stats library.

from scipy import stats

slope, intercept, r_value, p_value, std_err = stats.linregress(x, y)


Then, we can display the resulting data using Matplotlib. The chart will be displayed in the result window of Jupyter Notebook:


Google Research Colab is a very popular and simple tool for running all sorts of data set analysis tasks. This also includes deep learning using tensorflow library. It is a step forward into simplifying data analysis in the research community.


Sunday, April 16, 2017

Landing on The Moon using AI Bot

Recently I was playing around with OpenAI Gym and Keras Reinforcement Learning library (keras-rl). I was able to train an AI Agent for a task of landing on the Moon. 

OpenAI Gym provides all sorts of different environments to explore using AI bots. One of them is lunar lander, which I'll focus on here. 
Keras on the other hand is a high level library built on top of TensorFlow (or Theano). It provides mechanisms for constructing deep learning models easily. 

Creating a new environment using OpenAI Gym is as easy as this:

env = gym.make('LunarLander-v2')

Here's how you can add video recorder of progress during training:

env = gym.wrappers.Monitor(env, 
                           'recording', 
                           resume=True, 
                           video_callable=lambda count: count % record_video_every == 0
                           )

The model itself is quite simple DQN Agent with LinearAnnealedPolicy. The most important layer is Dense 512 neuron internal layer. It's responsible for understanding of the current situation during landing. Next small, dense layer on top of it is responsible for final decisions related to lunar lander actions (steering the engines).

Here's how it can be instantiated:

model = Sequential()
model.add(Flatten(input_shape=(1,) + env.observation_space.shape))
model.add(Dense(512))
model.add(Activation('relu'))
model.add(Dense(nb_actions))
model.add(Activation('linear'))
print(model.summary())

memory = SequentialMemory(limit=1000000, window_length=WINDOW_LENGTH)

policy = LinearAnnealedPolicy(EpsGreedyQPolicy(), attr='eps', value_max=1., value_min=.1, value_test=.05, nb_steps=1000000)

dqn = DQNAgent(model=model, nb_actions=nb_actions, policy=policy, memory=memory, nb_steps_warmup=50000, gamma=.99, target_model_update=10000, train_interval=4, delta_clip=1.)

dqn.compile(Adam(lr=.00025), metrics=['mae'])


Here's a summary of the model:

Layer (type)                     Output Shape          Param #     Connected to                 7    
flatten_1 (Flatten)              (None, 8)             0           flatten_input_1[0][0]            
dense_1 (Dense)                  (None, 512)           4608        flatten_1[0][0]                  
activation_1 (Activation)        (None, 512)           0           dense_1[0][0]                    
dense_2 (Dense)                  (None, 4)             2052        activation_1[0][0]               
activation_2 (Activation)        (None, 4)             0           dense_2[0][0]                    

Total params: 6,660
Trainable params: 6,660
Non-trainable params: 0


Training can take a lot of time. In this example I used 3.5 million steps.
The outcome gives quite reasonable behavior for lunar lander.
Note that depending on environment, learning can take less time (if environement is not very tricky). In this case I found that difficulties are related to sensitivity of the last phase of landing (touch down). It took some time for the model to figure this part out.

As a side note, OpenAI provides lunar lander Agent using optimal trajectory. In this example, the Agent polls environment to figure out actions that give highest output of Q function. 


Saturday, March 18, 2017

Classifying Dogs vs Cats on a Regular Laptop with 2GB GPU and 90% Accuracy


Machine learning ecosystem has evolved a lot during recent years.
I am amazed that I could run a very sophisticated experiment of classifying dogs vs cats with 90% accuracy on my regular laptop laptop.
It has 2GB NVidia GPU card and 8GB RAM.
Just in 2012 the state of art result of the dogs vs cats classification was 80%.

I ran it based on an excellent course provided by fast.ai (http://course.fast.ai/).
The competition is organized by Kaggle:
https://www.kaggle.com/c/dogs-vs-cats-redux-kernels-edition

Here's an overview of the approach taken to achieve 90% accuracy.
First, retrieve a publicly available model VGG16, which was prepared by scientists for image recognition competition (for ImageNet). Then remove last layer out of it and replace with Yes / No layer for recognizing cats vs dogs. The remaining layers were set as non trainable. Then run learning process for such model.

The main libraries used here are Keras with Tensorflow backend.

Full code is available on fast.ai website. Here in an overview of the most important parts.
Training code:

import tensorflow as tf
from keras.backend.tensorflow_backend import set_session
config = tf.ConfigProto()
config.allow_soft_placement=True
config.log_device_placement=True
set_session(tf.Session(config=config))

# Import our class, and instantiate
import vgg16; reload(vgg16)
from vgg16 import Vgg16
vgg = Vgg16()

batch_size=16
path = "data/dogscats/"
#path = "data/dogscats/sample/"
batches = vgg.get_batches(path+'train', batch_size=batch_size)
val_batches = vgg.get_batches(path+'valid', batch_size=batch_size)
vgg.finetune(batches)
vgg.fit(batches, val_batches, nb_epoch=1)
vgg.model.save('vgg2.h5')

The code uses vgg.finetune call to update the last layer of the model. Here's how it looks like:

model = self.model
        model.pop()
        for layer in model.layers: layer.trainable=False
        model.add(Dense(num, activation='softmax'))

Next, it trains model using vgg.fit call and saves result to vgg2.h5 file. 

I had to put a few tweaks to the model related to device placement for Tensorflow so it could fit in GPU memory. The last few layers were placed on CPU. Here's the code:

      model = self.model = Sequential()
        model.add(Lambda(vgg_preprocess, input_shape=(3,224,224), output_shape=(3,224,224)))

        with tf.device('/gpu:0'):
            self.ConvBlock(2, 64)
            self.ConvBlock(2, 128)
            self.ConvBlock(3, 256)
            self.ConvBlock(3, 512)
            self.ConvBlock(3, 512)

        with tf.device('/cpu:0'):
            model.add(Flatten())
            self.FCBlock()
            self.FCBlock()
            model.add(Dense(1000, activation='softmax'))

        fname = 'vgg16.h5'
        model.load_weights(get_file(fname, self.FILE_PATH+fname, cache_subdir='models'))


Here's the result of a learning process:

23000/23000 [==============================] - 2103s - loss: 0.5482 - acc: 0.8676 - val_loss: 0.4194 - val_acc: 0.9060

The training process completed in 35 minutes with 90% accuracy on validation set. 

I'm very positively surprised that such powerful machine learning tools are available these days and are runnable on regular computers. Moreover the approach presented by fast.ai is very interesting and resembles natural evolution of intelligence by adding new layers. 

Sunday, March 13, 2016

Learning Sine Function Using Neural Network


Recently I stumbled upon an excellent demo of a 2 layer neural network written by Florian Muellerklein: https://github.com/FlorianMuellerklein/Machine-Learning.

It is written in Python using numpy and focuses on digit recognition based on sklearn dataset.
I decided to play around with it and add visualization for learning process of a sine function.
I used matplotlib for creating an animation.

The neural network implementation is typical. It uses standard gradient descent procedure with some optimizations like momentum and regularization (also random initialization).
If you are interested in understanding how exactly gradient descent works, I highly recommend an article from Matt Mazur: http://mattmazur.com/2015/03/17/a-step-by-step-backpropagation-example.

The network architecture I used was following:

  • 1 input neuron (x parameter of sine function)
  • 60 hidden neurons
  • 1 output value (the function result)

Here is a link to source code: https://github.com/rafalrusin/Machine-Learning/tree/master2

It converges pretty well. Here's an animation showing convergence of sine function during consecutive learning iterations (10 learing iterations per frame):


Machine Learning is a very fascinating domain that has been emerging rapidly over recent years, mainly in visual object recognition. I hope that it keeps this pace in future (or even exceeds it!).

Saturday, May 16, 2015

Asymptotic Benchmark in Java

Most of the time when we analyze performance of different programs, we use Big O Notation and run performance tests for a single input size N, which measures execution time.

Both of these methods have disadvantages.
Big O Notation is theoretical (has no code verification).
Time based performance tests are not very reliable (it's hard to make assertions on them) and don't show the actual asymptotic function behind the programs.

Here I present a slightly different approach, which is a combination of those 2 techniques.
It uses explicit instruction counting, samples programs for different input sizes and tries to guess asymptotic function behind them.
It also plots the result as a chart using HTML and Google Visualization JavaScript Library.

Note that it's more of a toy for visualization than something one could use in the industry for real world projects.

First we start by implementing an example program (Binary Counter), which we want to measure. It'll extend a base class Benchmark, which looks like this (full source code is available on github: https://github.com/rafalrusin/abench):

public abstract class Benchmark {
    private int instructionCount = 0;

    protected void incrementInstructionCount() {
        instructionCount++;
    }

    public void resetInstructionCount() {
        instructionCount = 0;
    }

    public int getInstructionCount() {
        return instructionCount;
    }

    protected abstract Object run(int n);
}

It has abstact method "run", which takes input size as argument. This will be provided by the benchmark framework for different executions. 
Binary Counter implementation looks like this:

public class BinaryCounter extends Benchmark {
    @Override
    protected Object run(int n) {
        int[] counter = new int[64];
        for (int i = 0; i < n; i++) {
            int p = 0;
            while (counter[p] == 1) {
                counter[p++] = 0;
                incrementInstructionCount();
            }
            counter[p] = 1;
            incrementInstructionCount();
        }
        return counter;
    }
}

It is a 64 bit binary counter, which starts from 0 and increments values N times by one. Theoretically it should run in O(n) time. We'll verify that. 

We need to run it through the framework using following code:

public class Main {
    public static void main(String[] args) {
        BenchmarkRunner benchmarkRunner = new BenchmarkRunner();
        benchmarkRunner.addFormatter(new TextResultFormatter(new PrintWriter(System.out)));
        benchmarkRunner.addFormatter(new HtmlResultFormatter(new File("out")));

        for (Benchmark benchmark : new Benchmark[]{
                new BinaryCounter(),
                ...
                ) {
            benchmarkRunner.run(benchmark, 1);
        }
    }

Here's the chart generated for Binary Counter along with guessed function behind it:


In this case the guessed function is linear, which is what we expected. For input size of 5.6 millions, the instruction count was 11 million.

The guessing process is an iteration over all samples and optimization of Mean Squared Error.
It is implemented in BenchmarkRunner class. 
You can add more functions by extending Function interface. Here's an example of N log N function:

public class NLogNFunction implements Function {
    @Override
    public float eval(float x) {
        return (float) (Math.log(x) * x);
    }
}

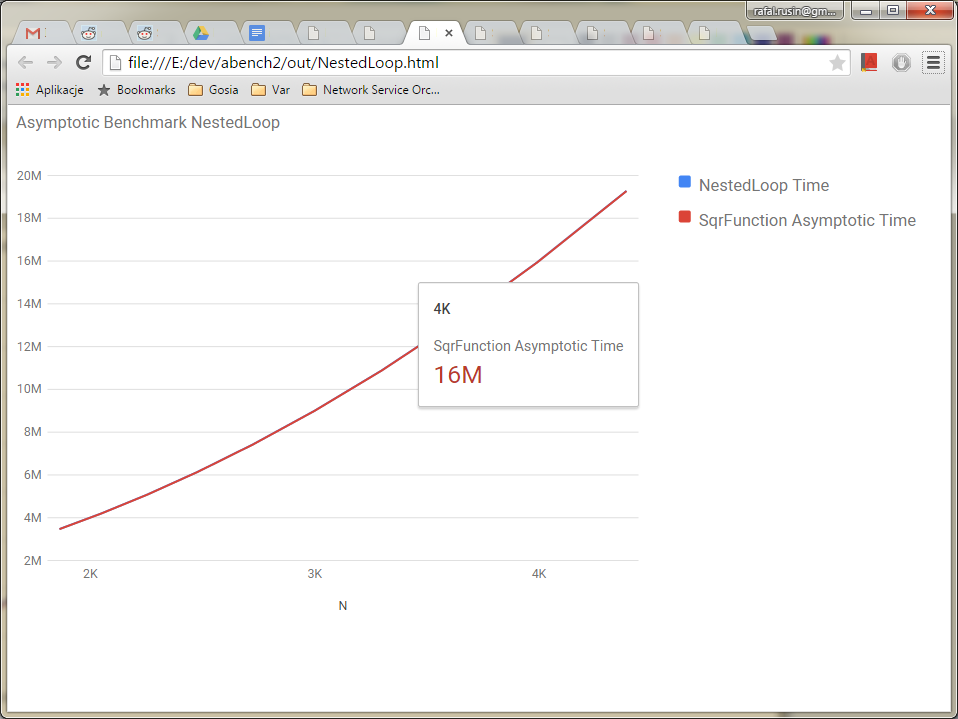
Here's some more benchmarks: MergeSort (expected asymptotic function is N log N) and NestedLoop (N^2). 


Implementing reliable performance tests is not a very well solved problem today. I think that the idea of instruction counting is something one can try to use in real world projects. It can be used for testing performance of isolated chunks of code, within unit tests, and can give predictable results. 

Sunday, November 23, 2014

Handling requests Asynchronously in Java using Jersey 2.13 and Glassfish 4.1


In recent Jersey release 2.x, there is a new API for async request processing. It includes an excellent example server-async-standalone-webapp.
In this article, I'll show how to run it and the results we can get by leveraging async processing.

First, we need to download Glassfish 4.1 Web profile (https://glassfish.java.net/download.html).
Then start it using command:

./asadmin start-domain

Next, we need to download Jersey examples bundle from https://jersey.java.net/download.html and compile server-async-standalone example by running 'mvn package'.

Then we can deploy it using following command:

./asadmin deploy <path>/jersey/examples/server-async-standalone/webapp/target/server-async-standalone-webapp.war

Now we are ready to login to Glassfish Admin Console (localhost 4848) and see the status of deployed application:


Now we're ready to run a client GUI application, which allows us to run tests against server. Go to 'server-async-standalone/client' and run 'mvn exec:java'. 
The application looks like below. I ran sync vs async test on 100 requests and got response times improved from 20 secs to 1.2 secs. 

Sync

Async


The code is following for sync:

    @GET
    @Path("sync/{echo}")
    public String syncEcho(@PathParam("echo") final String echo) {
        try {
            Thread.sleep(SLEEP_TIME_IN_MILLIS);
        } catch (final InterruptedException ex) {
            throw new ServiceUnavailableException();
        }
        return echo;

    }

And for async:

private static final ExecutorService TASK_EXECUTOR = Executors.newCachedThreadPool();
...
    @GET
    @Path("async/{echo}")
    public void asyncEcho(@PathParam("echo") final String echo, @Suspended final AsyncResponse ar) {
        TASK_EXECUTOR.submit(new Runnable() {

            @Override
            public void run() {
                try {
                    Thread.sleep(SLEEP_TIME_IN_MILLIS);
                } catch (final InterruptedException ex) {
                    ar.cancel();
                }
                ar.resume(echo);
            }
        });
    }

Note that in Async example, the number of background threads is unbounded (TASK_EXECUTOR is a cached thread pool without limit). So in reality it won't improve the amount of resources (threads) consumed by server in Aync mode. 
In Sync mode, the threads hold http executor. The default number of http worker threads in Glassfish is 5. This explains why we get response time around 20 secs for 100 requests. 

"http-listener-1(4)" daemon prio=6 tid=0x000000000cc7d000 nid=0xcf8 waiting on condition [0x00000000110ad000]
   java.lang.Thread.State: TIMED_WAITING (sleeping)
at java.lang.Thread.sleep(Native Method)
at org.glassfish.jersey.examples.server.async.LongRunningEchoResource.syncEcho(LongRunningEchoResource.java:77)
at sun.reflect.GeneratedMethodAccessor437.invoke(Unknown Source)
...

Note that this is just an example, which illustrates how to enable Async processing. In real world scenarios there can be a third party service, which can be invoked using Jersey Client on the server side. If that service slows down, then the whole http thread pool on the server side can be exhausted and prevent other requests from getting processed. 
The suggested solution in this case would be to switch to Async Jersey Client and Async service implementation. 

Async server processing can also help in case where there is a lot of slow clients. For example 20k mobile clients, who send payloads in chunks with 1 second delays. This scenario can easily bring down Sync server side implementations.

Async processing is gaining momentum on server side nowadays. There are multiple technologies, 
which enable it. Among them are NodeJS, Netty, Akka and Play Framework. Jersey Async processing is one of them.  


Saturday, July 5, 2014

Implementing a Distributed Counter Service Using Hazelcast, Jersey 2 and Guice

Modern web services are often required to scale horizontally in order to handle growing load.
Here I present an example distributed Counter service, which uses modern technology stack consisting of Hazelcast, Jersey 2 and Guice.

The sample is based on an excellent example posted by Piersy and can be downloaded from here:
http://github.com/rafalrusin/jersey2-guice-example-with-test

The counter is just a shared value across all participating nodes within a cluster. All nodes can query for data and increase it's value by specified delta. Note that Hazelcast handles synchronization within distributed environment. In order to update the state atomically, we use Hazelcast EntryProcessor.

@Singleton
public class CounterService {

    public int increase(final int delta) {
        return (Integer) map.executeOnKey("counterKey", new CounterEntryProcessor(delta));
    }
}

public class CounterEntryProcessor implements EntryProcessor<String, Integer>, EntryBackupProcessor<String, Integer> {
    private final int delta;

    public CounterEntryProcessor(int delta) {
        this.delta = delta;
    }

    @Override
    public Integer process(Map.Entry<String, Integer> entry) {
        int newValue = entry.getValue() + delta;
        entry.setValue(newValue);
        return newValue;
    }
}

The service is just a Guice Singleton. It has an operation called 'increase', which takes a delta and creates EntryProcessor job for Hazelcast to submit to a node, which owns the value at the time and will update it atomically.
Hazelcast is a library, which implements Java Collections in distributed fashion. It handles replication, cluster membership and distributed locking.

Web service is a simple JAXRS REST Resource. Following code invokes Guice service layer from Resouce implementation:

@RequestScoped
@Path("counter")
public class CounterResource {

    private CounterService service;

    @Inject
    public CounterResource(CounterService service) {
        this.service = service;
    }

    @POST
    @Consumes(MediaType.TEXT_PLAIN)
    @Produces(MediaType.TEXT_PLAIN)
    public String increase(String delta) {
        return "" + service.increase(Integer.parseInt(delta));
    }
}

We also have a test case, which invokes the whole stack and does a request to the service. The whole stack is very lightweight. In runs on Jersey with Embedded Tomcat. The test case completes within a few seconds.

In order to run the example, you need to build distribution first (run dist.sh), then start nodes in separate shells and invoke curl POST requests to manipulate counter state. Here's a sample interaction:

./run.sh 8090
./run.sh 8092
...
Jul 05, 2014 10:20:06 AM com.hazelcast.cluster.ClusterService
INFO: [10.0.0.12]:5702 [dev] [3.2.3]

Members [2] {
        Member [10.0.0.12]:5701
        Member [10.0.0.12]:5702 this
}

Jul 05, 2014 10:20:08 AM com.hazelcast.core.LifecycleService
INFO: [10.0.0.12]:5702 [dev] [3.2.3] Address[10.0.0.12]:5702 is STARTED
...

$ curl -d '1' -H 'Content-Type: text/plain;' http://localhost:8092/webapp/api/counter
22
$ curl -d '1' -H 'Content-Type: text/plain;' http://localhost:8090/webapp/api/counter
23
$ curl -d '5' -H 'Content-Type: text/plain;' http://localhost:8090/webapp/api/counter
28

I think that Hazelcast is a very good step forward into distributed computing. For an every day programmer, it's a set of primitives to manipulate in order to implement a distributed system. It is very easy to integrate it into existing project, which could be either JavaEE or standalone app.

Saturday, June 14, 2014

Running hadoop 2.2.0 wordcount example under Windows

Recently I went to Hadoop Summit in San Jose (http://hadoopsummit.org/san-jose/). The conference was quite interesting (excluding a few boring talks). I found out that HortonWorks is trying to push hard Hadoop into enterprise environment with Hadoop 2.x and Yarn. I love this idea, since there seems to be no good standard for distributed containers in Java these days (forget about JEE clustering).

Surprisingly enough, it looks like Hadoop 2.2.0 is supported natively on Windows, which IMO is a great achievement and is a sign of platform getting more mature.
In this article I show how to run a simple WordCount example in Hadoop 2.2.0 under Windows.

First of all, you need to compile hadoop 2.2.0 distribution, which takes a lot of time (and sometimes tweaking pom files). I uploaded a precompiled version here. You need to edit windows environment variables and add path to bin dir and HADOOP_HOME variable pointing to the dir.

Then you need to format node and run example. Following commands do that:

E:\test>hdfs namenode -format

E:\hadoop-2.2.0\sbin>start-dfs

E:\hadoop-2.2.0\sbin>start-yarn
starting yarn daemons

E:\test>hdfs dfs -mkdir /input

E:\test>hdfs dfs -copyFromLocal file1.txt input

E:\test>hdfs dfs -cat /input/words.txt
...

E:\test>yarn jar E:\hadoop-2.2.0\share\hadoop\mapreduce\hadoop-mapreduce-examples-2.2.0.jar wordcount /input/words.txt /output
14/06/14 14:29:47 INFO Configuration.deprecation: session.id is deprecated. Instead, use dfs.metrics.session-id
14/06/14 14:29:47 INFO jvm.JvmMetrics: Initializing JVM Metrics with processName=JobTracker, sessionId=
14/06/14 14:29:48 INFO input.FileInputFormat: Total input paths to process : 1
...

E:\test>hdfs dfs -cat  /output/part-r-00000
abc1    1
abc2    3
abc3    1

I hope that Hadoop 2.x gains wide adoption in Enterprise Environment, since the industry needs the next gen standard for distributed apps.

Saturday, August 25, 2012

How to create a native Java App

Recently, I stumbled upon JCGO, an interesting project, which translates Java 1.4 code into C.
In this article, I show how to create a native Windows app out of a small Java app.

The Java app I will use is NetCat (https://github.com/rafalrusin/netcat). You can download precompiled executable, netcat.exe, from https://github.com/rafalrusin/netcat/downloads.

So the first step is to download all dependencies. I will use MinGW, MinGW GCC, jcgo-lib-1_14.tar.gz, jcgo-src-1_14.tar.bz2, classpath-0.93 (http://ftp.gnu.org/gnu/classpath/classpath-0.93.tar.gz) and Java sources for the app with dependent libraries: https://github.com/rafalrusin/netcat, commons cli 1.2 (http://commons.apache.org/cli/download_cli.cgi). You need to put all this in the same directory, so it'll have structure like this:

auxbin
classpath-0.93
commons-cli-1.2-src
dlls
goclsp
src
jcgo
jcgo.exe
jcgo.jar
libs
miscsrc
netcat
out
rflg_out
stdpaths.in

Then, you need to run Java to C translator by using command:

jcgo.exe -sourcepath netcat/src -sourcepath commons-cli-1.2-src/src/java netcat.NetCat @stdpaths.in -d out

Initializing...

Analysis pass...
Output pass...
Writing class tables...
Creating main file...
Parsed: 293 java files (2699 KiB). Analyzed: 3067 methods.
Produced: 640 c/h files (3769 KiB).
Contains: 1490 java methods, 4119 normal and 288 indirect calls.
Done conversion in 1 seconds. Total heap size: 36572 KiB.

Next step is to compile it into final executable. Following command does this:

gcc -DJCGO_INET -DJCGO_NOFP -DJCGO_WIN32 -DJCGO_THREADS -I src/include/ -I src/include/boehmgc/ -I src/native/ out/Main.c -o netcat.exe libs/x86/mingw/libgcmt.a -lws2_32

I used some switches, which are suitable for this particular app. For example, by default JCGO doesn't use multithreading or networking. This has to be enabled explicitly. 

And that's it. Now you can try out the app by calling google.com, like this:

$ netcat.exe google.com -p 80
Connecting to google.com port 80
GET
HTTP/1.0 302 Found
Location: http://www.google.pl/
Cache-Control: private
Content-Type: text/html; charset=UTF-8
Set-Cookie: PREF=ID=2f3085ac38771e98:FF=0:TM=1345885031:LM=1345885031:S=8A-IkreMgCogMsey; expires=Mon, 25-Aug-2014 08:57:11 GMT; path=/; domain=.google.com
Set-Cookie: NID=63=O_QZ4bDrzYNiiE0DY8RT-34c_pGt_OZagP3gzrzqCAx_Xo2kO7s9zVrUOx7FVz4TyAEY7Wx9UhglYZSX9UHSdzT7c9mUKzfkJFp5lk5FyfiMIcKITLhgSX4__3QwEYBS; expires=Sun
, 24-Feb-2013 08:57:11 GMT; path=/; domain=.google.com; HttpOnly
P3P: CP="This is not a P3P policy! See http://www.google.com/support/accounts/bin/answer.py?hl=en&answer=151657 for more info."
Date: Sat, 25 Aug 2012 08:57:11 GMT
Server: gws
Content-Length: 218
X-XSS-Protection: 1; mode=block
X-Frame-Options: SAMEORIGIN

<HTML><HEAD><meta http-equiv="content-type" content="text/html;charset=utf-8">
<TITLE>302 Moved</TITLE></HEAD><BODY>
<H1>302 Moved</H1>
The document has moved
<A HREF="http://www.google.pl/">here</A>.
</BODY></HTML>
^Z

I like the approach of translating Java code into C, because compared to other tools, which generate C++ code, this is more suitable for embedded devices. For example it is possible to generate code for iOS, because Objective C is a superset of C.

One feature I would like to see though is to be able to use reference counting instead of full gc. This is because one of the advantages of C over Java is that it doesn't have GC hangs. So then the programmer would have to make sure there's no cycles in orphaned object structure.

Update: Ivan Maidansky, an author of JCGO, has put some interesting comments regarding this article. In particular, he is aware of some apps in Apple Store, which do this kind of translation. Also, reference counting is discouraged due to multithreading issues. These comments can be found here: https://github.com/ivmai/JCGO/issues/2

Saturday, May 19, 2012

NetCat in Java

Recently, I tried to run netcat under Windows and I failed to compile it. So I decided to write a simple equivalent in Java, which works under all platforms.

NetCat is a very simple and useful tool, which allows to see contents of TCP/IP requests, like HTTP etc., both server and client side. With NetCat it is possible to either set up TCP/IP listener on a port and receive data or send TCP/IP request to remote server.

The code and executable for Java version of NetCat is available on GitHub:
http://github.com/rafalrusin/netcat/downloads

I used Jakarta Commons CLI to handle commandline parameters. The code is as simple as that:


In order to handle stream I/O I implemented a simple StreamTransferer class like this:


The only issue I had was that whenever I closed Java I/O stream using OutputStream.close(), it was closing the whole socket. So I couldn't receive any response back from server. So instead of doing that I had to use Socket shutdownOutput method, like in the code below.


It worked perfectly then.

So it is possible to send HTTP GET requests to google using this tool. In order to do that, you need to connect to google.com and type GET and enter. CTRL+Z and enter is for closing input stream under Windows. CTRL+D is for Linux. The example looks like below:


Saturday, December 17, 2011

Table viewer using JQuery plugin and JEE

DataTables is a JQuery plugin, facilitating building Ajax table editors. In this example, I show how to connect it to JEE backend, which is a simple Servlet. Backend exposes a table, stored as a Java List within Servlet instance. Data is served back in JSON format using Jackson library.

Example is deployed on Google App Engine, datatablesjee.appspot.com. Code is available on GitHub github.com/rafalrusin/datatablesjee.

First, we need to instantiate DataTables plugin within a html page. This is extremely easy, by using code below:

AjaxSource parameter refers to Servlet URI, which handles requests for data. ServerSide argument is set to true, which means that backend will do sorting, filtering and pagination. This allows us to use large tables (>1000 rows) without performance problems on client side.

Now, we need to implement backend. Servlet requires a doGet method, which needs to retrieve parameters sent from client as an Ajax request. Those parameters describe search keyword, starting row and page size of a table.

Then, we need to do filtering and sorting. I used a simple toString + contains methods on a single row in order to do filtering. Sorting is done via custom comparator, which sorts by given column number. Following code does the job:

Last, we need to send JSON response back to client. Here, we use Jackson, which is a very convenient library for manipulating JSON in Java.

iTotalRecords is total number of records, without filtering. iTotalDisplayRecords is number of records after applying filter. aaData is two dimensional array of strings, representing visible table data.

Summing up, I like the idea of Ajax in this form, because client side is not rendered directly by backend (no jsp, etc.). This makes it a detached view, which could be served as static content, from Apache Web Server for example, which is very performant.

Sunday, November 13, 2011

Running Qt4 Examples on Embedded Linux using ARM emulator

In this article I will show how to run Qt4-Embedded Examples on Angstrom Linux using QEMU. The procedure doesn't require any compilation or cross compilation. It uses Angstrom Linux precompiled packages, online image builder, and works both on Windows and Linux.
Qt4 Embedded allows to run Qt applications directly in Linux Framebuffer, bypassing X Windows completely. This is especially important during embedded development, because it allows to save a lot of memory and start up time.

Qt4 has a rich set of examples directly embedded into Qt sources. Below is a few samples of how it looks like:
I will show how to run them.

First, you need to install QEMU. For Windows, the easiest way is to download zipped executables, which I shared here: Qemu-windows-0151. For Linux it's usually apt-get install qemu-system.
Then, we need to build Angstrom image. For those unpatient, I shared a prebuilt image here: angstrom-qt4-embedded. Angstrom has online image builder available here: Angstrom Image Builder. You need to pick console image and download it. The small trick is that you need to download kernel image yourself (from here: kernel-image-2.6.37.2_2.6.37-r4.6_qemuarm.ipk) and unpack it using ar -x kernel-image.ipk command. This is because online image builder doesn't include kernel image for some reason. However this step is not required if you download the image I shared.

Next, you need to start QEMU using kernel image and prebuilt angstrom image. The command looks like this:
qemu-system-arm -M versatilepb -usb -usbdevice wacom-tablet -show-cursor -m 64 -kernel zImage-2.6.37.2 -hda disk.img -append "root=/dev/sda2 rw"
For convenience, I prepared run script, which does that.

Next, you need to login as root and install qt4-embedded using command: opkg install qt4-embedded. This can be again skipped if you use the image I prepared.

In order to run demos, you need to use this command:
qtdemoE -qws
It looks like this:
You can run the other examples from Qt, in standalone mode from /usr/bin/qtopia directory. You need to use similar command app -qws. The command is required to initialize Qt framebuffer. It is possible to run a few executables on the same display. In order to do this, you need to run the first one only with qws parameter. The other apps will connect to it.

Have fun!

Sunday, October 16, 2011

Red Black Tree Visualization using HTML5 Canvas and GWT

I created a sample app, which demonstrates HTML5 Canvas usage from Java through GWT. I think GWT is a great tool for migrating desktop apps into Web nowadays, especially for Java developers. So it's worth to give it a try.

Google has made great progress on migrating desktop apps into Web during last year. They propagated trend for HTML5 support and Javascript JIT compilers among modern browsers. So it's possible to run Quake 2 or CAD software directly in browser at decent speed.

Red Black Tree is a balanced BST tree. Details are described on Wikipedia.
You can run this sample app directly on appspot (it works on iPhone too :-) )
Sample code can be found here: Browse on GitHub.


Let's start from initialization.
First, we need to create Canvas element and add it to HTML. getContext2D is called to obtain drawing context.
We register a timer to redraw frames frequently:

So doUpdate is called every 50 ms and whenever redrawFrame is set to true, it redraws Canvas contents.
In autoplay mode, we call processFrame in while loop. So whenever redraw procedure takes too long, we will process frames without redrawing them. This won't slow down animation on low resources.

Then, we need to draw a tree. We use drawTree procedure, which is recursive and draws nodes along with contents and connections between them:

The best part is that we can do regular Java unit tests on Red Black tree to verify correctness of implementation:

Monday, October 3, 2011

Grammar parser in C++

Recently I stumbled upon implementing a simple parser in C++. The task is very classic, however I couldn't find any good resources on the web to help me out.
I tried different tools (including ANTLR), but finally the easiest way I found was bison + flex. It's unbelievable that this technology from 1989 is still actively developed. Latest stable release is from May 14, 2011. Moreover, many important projects make use of it. Among them are Ruby, PHP, Google Go, Bash shell.
So I decided to create a minimalistic example, which works from scratch.
I published the code on github Calculator, so you can check it out.
The whole example is 88 lines long and evaluates common expressions, like 2+2*2-13*(7+19/2).
Let's start with lexer. In flex, you need to define regular expressions, which produce tokens. Such tokens are later processed by a scanner. So we have to define calculator.lex, like this:

Flex will generate yylex() function, which we can call later to produce tokens.
Next, we need to create a scanner (calculator.y), which specifies a grammar. It's simple like that:

Here, we specify types for all tokens using C/C++ union like structure. Variable $$ is used to store result of particular reductions.
Additionally, we need to specify %left precedence for +, -, *, / operators to resolve shift / reduce conflicts between them.
And that's basically it. We have a working expression parser.
I implemented it in a way, that executable takes a file name containing expressions as an argument.
So you can try ./calculator input.txt to see the result.

Sunday, June 12, 2011

Visualizing GIS data in JavaFX 2.0 beta using GeoTools

Geographic data mostly comprises of polygon coordinates sets along with attributes, like country or city name, etc. This is quite easy to visualize in JavaFX, which supports rendering for SVG paths.
In the article, I show how to read such GIS data from ESRI type database files using open source library GeoTools.
The data itself comes for free from www.naturalearthdata.com.
Sample code can be found here: Browse on GitHub.


GIS data usually comes in form of SHP and DBF files. In order to read it, we use GeoTools parser. Following code iterates over so called "features" from within data files and retrieves name attribute and shape geometry.


Next, we need to create JavaFX polygons for each feature from iteration. Small note here. Each feature may comprise of multiple polygons. For example "United States" shape may contain separate polygon for Alaska. So we need additional loop to generate such polygons.
In order to create a polygon in JavaFX, we use Path class along with MoveTo and LineTo path elements. Following snippet does the job.


The remaining part is to implement zoom and panning functionality. This is fairly easy in JavaFX. We can use translate and scale properties from main Group shape. Panning functionality is handled using following snippet:


Zoom is coded this way:


That's it. Now we have basic GIS data viewer in JavaFX 2.

Tuesday, March 22, 2011

Implementing graph editor in JavaFX using MVC like approach

JavaFX has very good SVG support, embedded into language runtime. This makes it interesting choice for implementing custom UI components, which includes graph editors.
In this article, I show how to create a simple graph editor, using MVC like approach and XML serialization via XStream.

Example can be found here: Launch JNLP, Browse on GitHub.
Application brings graph editing functionality and maximum network flow computation using Ford Fulkerson algorithm


Architecture is divided into Model, View and Controller. I made a slight upgrade to classic understanding of MVC. Classic View was responsible for displaying data only. Here, View consists also of UI parts, which include editable labels or combo boxes. Also, in Classic MVC, Model was responsible for refreshing View after Model changes by sending events to registered views. Here, Controller is responsible for refreshing View after Model changes and Model is just a plain POJO structure. I found such approach easier to implement.

Model consists of Three Java classes (non JavaFX), which represent structure of a graph: MNode, MShape, MConnection. Separating those classes from UI gives benefit of easier serialization. In this case using XStream::toXML(model) does the job. Sample output is like this:


View consists of corresponding UI implementations for Model elements, which are UINode, UILine, UIShape. Here, UINode is connected to MNode through model property. This is Bridge Pattern like approach for splitting class hierarchy of nodes into two.
UINode classes refer to controller to perform user input actions, like delete node.

Controller implements user action logic. This includes add, delete, and drag node. It is also responsible for refreshing UI after model changes. In order to do that easily, it uses Weak Hash Map, which keys are Model nodes and values are UI Nodes. Update function is like this:

Because of Weak Hash Map, removing nodes from Model leads to removing corresponding UI elements from map automaticly.

JavaFX SVG support and Layouts make it easy to render quite good looking nodes and connections.

Monday, March 7, 2011

Drawing arrows in JavaFX

Some time in the past, I was wondering what's the easiest solution for drawing arrow connections between shapes. The problem boils down to computing boundary point for given shape, which intersects with connecting line.
The solution is not so difficult when we consider polygon shapes. But it becomes more difficult considering curves and far more difficult for generic SVG shapes.
In this article, I show a simple way to find such boundary points for generic SVG shapes, utilizing JavaFX "contains" method and simple bisection algorithm.
Following application does the job: Launch JNLP, Browse on GitHub.
Application allows to drag shapes to track shape boundaries.

So, "contains" method in JavaFX allows us to poll any 2D point for intersection with SVG shape. Next, we need to assume, that we know a point inside a shape, from which every ray has exactly one intersection. This includes star-like shapes and ellipses. Next, we can use simple bisection algorithm to find such boundary point. We cut off once length between two points is too small. Following snippet does the job: Next, we need to draw arrows on the ends. In order to do that, we can use JavaFX Affine Transform, which is matrix transformation for SVG path. We need to compute transformation vectors for the matrix. This sounds scarry, but in fact is relatively easy. First vector in matrix is (targetPoint - sourcePoint) / length. Second one is perpendicular to it. Following code applies transformation:

Saturday, October 23, 2010

Sunday, July 18, 2010

jetty webapp osgi way

I will show how to expose simple Jetty OSGi service and use it to register hello world webapp. This app will serve static content from OSGi bundle and implement sample request handler under ServiceMix 4. Code is available here: http://github.com/rafalrusin/jetty-service
Alternative solutions are: using standard OSGi HTTP service http://www.osgi.org/javadoc/r4v42/org/osgi/service/http/HttpService.html to register servlet; and wrap existing WAR application using PAX WEB http://wiki.ops4j.org/display/paxweb/Pax+Web. I won't consider those two, since Jetty itself provides flexible way to handle webapps (including registering servlets). So those two are unnecessary overhead and are less flexible. Anyway those two are usually implemented on top of Jetty.
So the first thing to do is to create Jetty OSGi service. Basicly it will be a Spring Bean exposed to OSGi. Following snippet does the job:
<bean id="jetty-service" class="org.apache.jetty.service.JettyServiceImpl" init-method="init" destroy-method="destroy"/>
<osgi:service id="jetty-service-osgi" ref="jetty-service" interface="org.apache.jetty.service.api.JettyService" />

This will expose jetty-service to OSGi. All other components, which connect to it will wait automaticly until it's registered. Exposed interface has following methods:
public Handler registerApp(String name, Handler handler) throws Exception;
public void unregisterApp(Handler handler) throws Exception;

Those will be invoked to register Hello World application. JettyServiceImpl on the other hand, starts embedded Jetty Server and handles apps registration.
package org.apache.jetty.service;

import org.apache.jetty.service.api.JettyService;
import org.mortbay.jetty.Handler;
import org.mortbay.jetty.Server;
import org.mortbay.jetty.handler.ContextHandler;
import org.mortbay.jetty.handler.ContextHandlerCollection;

public class JettyServiceImpl implements JettyService {
 private Server server;
 private ContextHandlerCollection rootContext;

 public void init() throws Exception {
  server = new Server(8080);
  rootContext = new ContextHandlerCollection();
  server.setHandler(rootContext);
  server.start();
 }

 public void destroy() throws Exception {
  server.stop();
 }

 public Handler registerApp(String name, Handler handler) throws Exception {
  server.stop();
  ContextHandler h = rootContext.addContext("/" + name, name);
  h.setHandler(handler);
  server.start();
  return h;
 }

 public void unregisterApp(Handler handler) throws Exception {
  server.stop();
  rootContext.removeHandler(handler);
  server.start();
 }
}


Next step is to implement sample web app. First, we need to connect jetty-service bean to make it visible in our app.
  <osgi:reference id="jetty-service" interface="org.apache.jetty.service.api.JettyService" bean-name="jetty-service"/>

  <bean class="org.apache.jetty.service.example.HelloWorld" init-method="init" destroy-method="destroy">
    <property name="jettyService" ref="jetty-service"/>
  </bean>

Then, we need to implement sample app.
package org.apache.jetty.service.example;

import java.io.IOException;

import javax.servlet.ServletException;
import javax.servlet.http.HttpServletRequest;
import javax.servlet.http.HttpServletResponse;

import org.apache.jetty.service.api.JettyService;
import org.apache.jetty.service.util.BundleResource;
import org.mortbay.jetty.Handler;
import org.mortbay.jetty.HttpConnection;
import org.mortbay.jetty.Request;
import org.mortbay.jetty.handler.AbstractHandler;
import org.mortbay.jetty.handler.ContextHandler;
import org.mortbay.jetty.handler.ContextHandlerCollection;
import org.mortbay.jetty.handler.ResourceHandler;

public class HelloWorld {

 private JettyService jettyService;
 private Handler registered;

 public void setJettyService(JettyService jettyService) {
  this.jettyService = jettyService;
 }

 public void init() throws Exception {
  ContextHandlerCollection handler = new ContextHandlerCollection();

  handler.addContext("/app", "app").setHandler(new AbstractHandler() {
   public void handle(String target, HttpServletRequest request,
     HttpServletResponse response, int arg3) throws IOException,
     ServletException {
          response.setContentType("text/html");
          response.setStatus(HttpServletResponse.SC_OK);
          response.getWriter().println("<h1>Hello World from Java</h1>" + request.getParameterMap());

          Request base_request = (request instanceof Request) ? (Request)request:HttpConnection.getCurrentConnection().getRequest();
          base_request.setHandled(true);
   }
  });

  ResourceHandler resourceHandler = new ResourceHandler();
  resourceHandler.setBaseResource(new BundleResource(getClass().getResource("/static")));
  ContextHandler contextHandler = handler.addContext("","");
  contextHandler.setHandler(resourceHandler);

  registered = jettyService.registerApp("helloWorld", handler);
 }

 public void destroy() throws Exception {
  jettyService.unregisterApp(registered);
 }
}

Here, we register sample request handler at 'app' sub path and serve static content from jar using BundleResource. Last thing is registering app using jettyService under 'helloWorld' context. So our application will be exposed under http://localhost:8080/helloWorld/ address.
ServiceMix has also so called features. This is the way to collect multiple dependencies under a single name. So we have to create features.xml file, like this:
<features>
    <feature name="jetty-service" version="${project.version}">
        <bundle>mvn:org.apache.jetty.service/service/${project.version}</bundle>
    </feature>

    <feature name="example-jetty-service-helloworld" version="${project.version}">
        <feature version="${project.version}">jetty-service</feature>
        <bundle>mvn:org.apache.jetty.service/example-helloworld/${project.version}</bundle>
    </feature>
</features>

Basicly, we can provide particular dependencies for our project.
Next, we do 'mvn install' on our project and run apache-servicemix-4.2.0-fuse-01-00/bin/servicemix karaf console. On the console, we need to type following commands:
features:addUrl mvn:org.apache.jetty.service/service-karaf/0.1.0-SNAPSHOT/xml/features
features:install example-jetty-service-helloworld
osgi:list

[ 230] [Active     ] [            ] [Started] [   60] Unnamed - org.apache.jetty.service:service:bundle:0.1.0-SNAPSHOT (0.1.0.SNAPSHOT)
[ 231] [Active     ] [            ] [Started] [   60] Unnamed - org.apache.jetty.service:example-helloworld:bundle:0.1.0-SNAPSHOT (0.1.0.SNAPSHOT)

Now, we can enter http://localhost:8080/helloWorld/ to test our app.
And that's it. OSGi and ServiceMix 4 features enable easy way to use dynamic modules in web apps. For example, it's very easy to build simple web framework with loadable components on page (something like mini implementation of Portlets).